Let’s face it: crunches can only take you so far. Eventually, your body becomes used to that repetitive motion, and you end up hitting an unfortunate plateau. If you’re looking to tone, strengthen, and flatten further, try out some crunchless abs workouts. We caught up with Teresa Tapp, creator of the T-Tapp Method of Movement and author of Fit And Fabulous in 15 Minutes, to learn some strategies for working your core—without doing a single crunch.
Fit Nation: How can crunchless ab exercises improve your core in ways that traditional crunches can’t?
Teresa Tapp: Traditional abdominal crunch and core exercises generally involve isotonic activation with greater pull from one attachment to belly of the muscle along with momentum during movement, whereas crunchless ab exercises—including those I outline below— have more muscles comprehensively activated (full fiber tension) with greater focus on linear alignment and leverage isometric activation during movement. Greater internal activation along the spine with leverage isometric activation (ribs up) really is the secret for success for lifetime awesome abs—no crunches needed.
FN: What does varying abdominal workouts do for your core?
TT: I believe it is important to create and maintain full fiber tension in muscles that attach from your spine-to-shoulder and your spine-to-hip, as well as from your hip-to-knee and your knee-to-ankle for optimal core and abdominal muscle development. That’s why I recommend doing only one set of eight repetitions.
FN: What particular muscles get worked out using your techniques?
TT: At least 5-7 muscles are involved while doing each crunchless ab movement sequence. The T-Tapp technique involves activation of multiple muscles with full fiber tension in combination with leverage isometrics. Since T-Tapp centers on the spine, all core muscles get activated, especially the transverse abdominus and latissimus dorsi, but so do all the muscles in your legs and arms. It really maximizes muscle activation from head-to-toe, and what you learn from the workout can be applied to every move you make throughout the day.
FN: What inspired you to develop these techniques, and what inspires your workout strategies and vision?
TT: My primary inspiration for creating the 15-minute T-Tapp Basic Workout was to become functionally fit and pain-free. The fact that full fiber activation of multiple muscles in a special sequence develops muscles with greater density with “Spanx power” to quickly cinch-in and sculpt your body was just icing on the cake for me. My inspiration is to help everyone understand how to optimize muscle activation to achieve results and to help achieve and maintain balance. I enjoy helping others look and feel better. In my opinion, nothing looks better than feeling better!
FN: What kind of results have you seen stem from using crunchless ab techniques?
TT: Visible inch loss can be seen within days, and your body will continue to sculpt, tighten and tone each week, as long as you execute each exercise to your personal best ability. It is very common for people to lose at least one clothing size per month without dieting. What’s amazing to me is that the same exercises continue to challenge everyone regardless of fitness level, age or size. It also amazes me how quickly a person can improve strength, flexibility, and heart health without any impact, equipment, or stretchy bands. It’s all about understanding the power of your body as a machine and how to maximize muscle activation to build a better body that looks, feels, and functions better. Using a crunchless ab routine, such as the T-Tapp method, really is the best way to develop your abs.
Falling in love with Teresa’s system as much as we are? Yeah, we thought so. Well, get prepared to like her even more: Teresa is offering a discount exclusively to Fit Nation readers through March 30, 2015: just enter the code FN20 and you’ll get 20% off on anything on her site—workouts, clothes, supplements, or anything else that strikes your fancy.
Check out some of Teresa’s best ab-busting moves below:
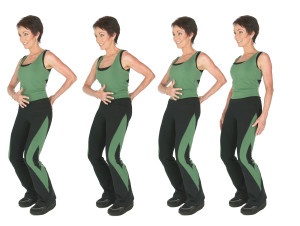
1. The Set Up Stance
1st pose: With toes forward, ankles aligned with hip joints and knees bent, place your dominant hand (palm) on belly and your other hand (palm) on back.
2nd pose: Press your hands into your belly and back to help press your belly button into spine to help tuck your tailbone under without using gluteal muscles to curl your core.
3rd pose: Then tighten your glutes to stabilize tucked position. Then press your back hand to lift ribs and shift your shoulders back into alignment with hips.
4th pose: Then tighten your lats to stabilize ribs up and shoulders back position and finish with placing your arms down with palms facing inward.
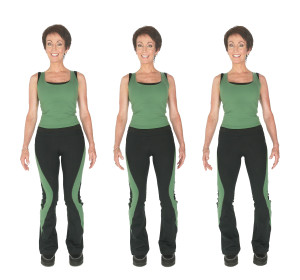
2. Knees Out
1st pose: Body alignment is important. This first image shows most common error with weight distribution of feet more onto the ball joint of the big toe, rather than neutral with knees aligned with ankles and hip joints.
2nd pose: This image shows proper alignment during initial set up. Weight distribution is more into your heels with knees slightly out aligned with hip joint. This position is proper for first 3 set up steps (bend, tuck/curl, ribs up/shoulders back).
3rd pose: This image of knees pushing out towards little toe is the final step to create optimal activation of multiple muscles, especially transverse abdominus, psoas, and glutes (both max and minimus).
Weight distribution is off the the ball joint of your big toe. You should feel the arch of your foot lift and all of your leg, ab, and glute muscles activate a bit deeper.
Form tip: Activation should initiate from your knees, not your hips. Once your knees are out to best ability without rolling ankle, then focus to activate the muscles that attach to your your hip joint with a slight turn out.
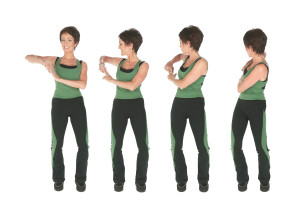
3. Push-Tuck-Turn Warm Up Stretch
1st pose: Assume T-Tapp Stance with knees bent, tailbone tucked, knees out, and ribs up. Then lift your right elbow up in alignment with right shoulder, or slightly higher (never lower!). Then place the fingertips of your left hand on the knuckles of your right hand and PRESS. You should feel your ribs lift up higher and your lats tighten more.
Form tip: Always maintain pressure on knuckles to keep your ribs up and lats activated. This not only optimizes results, it also provides protection.
2nd and 3rd pose: Inhale big, and then while exhaling, slowly push the knuckles on your right hand to move your right elbow and upper body toward the back wall.
Form tip: Focus on pushing out your opposite knee (left knee) in order to stabilize your hips, and create isolation activation of your upper body from your lower body (your eyes should follow your elbows).
4th pose: Repeat big inhale with ribs up to best ability and then during exhale push your knuckles to push your elbow back to best ability and hold for 4 counts.
Then kick out your legs a few times, reset and repeat to the other size.
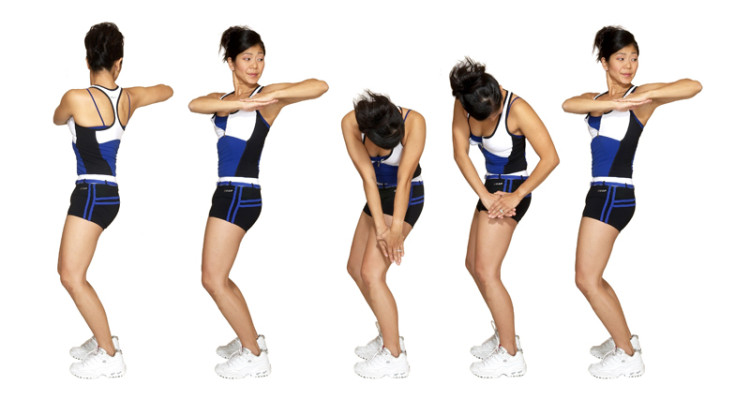
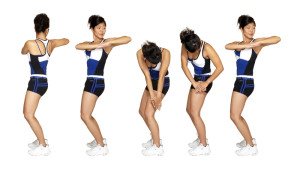
T-Tapp Twist
Beginning Position – Assume T-Tapp Stance. Then place your right hand on top of your left hand at chest level with elbows up and aligned with shoulders. Hands should PRESS together at all times to lift ribs and activate lats.
1st pose: Use your right hand to PRESS and PULL your upper body to right side for 2 pulses (counts 1-2).
2nd pose: Then use your right hand to PUSH your upper body all the way to left side in one count without moving lower body (count 3).
Form tip: Keep tailbone tucked, knees out, ribs up and elbows level with shoulders at all times.
3rd pose: Then with hands pressing together reach down in one count with fingertips reaching behind your left knee (count 4).
Form tip: Weight distribution while reaching down should be in left leg with both knees bent and pushing out towards little toes.
4th pose: Slowly roll up, keeping hips and knees forward and hands pressing together to top of thigh (count 5), and at hip (count 6).
5th pose: Continue to roll up to chest level (count 7) and finish with extra PRESS to lift ribs up (count 8).
REPEAT for a total of 8 sets twisting to the right and reaching down on the left.
Then kick out a few times, reset and repeat OTHER SIDE.
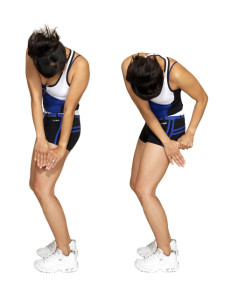
5. Side View of T-Tapp Twist – Form Tip for Greater Isolation Activation
1st pose: For greater isolation, core, and ab activation, place your hands together as shown in the photo with your right hand/thumb interlocking with your left hand/thumb slightly “pulling away” for leverage isometric activation.
2nd pose: Continue to pull your right thumb to help pull your shoulders into a more level position to optimize isolation activation.
Form Tip: Always focus to keep your knees bent, your hips forward, and your knees out at all times. Release your head down and relax your neck when reaching down.
Check out more of Teresa Tapp‘s fab workouts, and follow her on Twitter.

